Bow Drill Step by Step Method
Overview
See the Principles section for an overview and detail on the components, and how to make each component before proceeding onto this section. This is not a definitive guide or the only way, but is the technique I use, you may find a slightly different technique works for you.
The below video walks you through an overview of making and using a Bow Drill set. There are a couple more demo videos here.
The below video walks you through an overview of making and using a Bow Drill set. There are a couple more demo videos here.
Preparation: When practicing it doesn't matter if an ember is coaxed or not! When you are ready to welcome a fire then do have everything ready and to hand. Prepare your fire wood ready and have your tinder bundle ready. (I also like to give my thanks and blessings to the ancestral fire.)
Note: I'm right handed so you do the opposite if left handed :)
Note: I'm right handed so you do the opposite if left handed :)
Step by Step Method:

1) With a knife make a depression in the prepared hearth board, where the drill will sit and spin to burn in. Preferably the edge of the circle needs to be about 5mm-10mm away from the edge of the hearth board- you don't want it too far from the edge or too close!
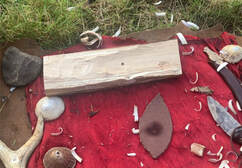
2) Place the hearth board on the ground. I place it on top of a piece of leather - and in ritual it more resembles an altar! A piece of leather can prevent debris getting in the way (this is my personal preference especially in woodland or in long grass.)
3) Get into position
3a) You need to get yourself in a position that is comfortable, and allows you to breath easily - and remember to breath!
This photo shows my preferred position, with my left foot on the hearth board to stop it from moving, and my right knee\shin on the ground. My thigh is at right angles to my calf and helps place my weight over the top of the drill more and it allows me to apply more downward pressure especially with harder woods..
My left hand is holding the bearing block and my left wrist is locked in position by my leg to stop the drill from moving (this is VERY important as it stops the drill moving around.) My right hand is holding the bow. I apply downward pressure by pressing down with the left hand.
It may take a few practices to get into position and choose the position which works best for you.
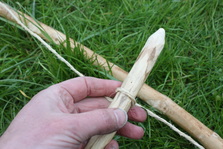
3b) I kneel first infront of the hearthboard, with everything within reach. I twist the drill into the bow. With the cord attached to the bow at both ends, I place the middle-ish (more towards top than bottom) of the drill with the blunt end of the drill facing towards the ground, on top of the cord (to the left of the middle of the cord) so the cord is between the drill and bow. I take the slack cord to the right of the drill and twist over the top of the drill (to the left), I then twist over a 2nd time (again right to left) and push the cord loops down on top of each other and move the drill to vertical position with my left hand (you should have to apply some pressure to do this and the cord should be taut) and with the right hand hold the drill and bow in place. (with a flexible bow you can bend the bow to get enough cord to wrap around.) You may need to adjust the cord accordingly so it is taut. The drill doesn't have to be exactly in the middle of the bow.
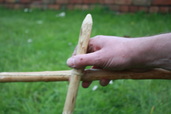
3c) I hold the drill and bow with my right hand. I then pick up the bearing block with my left.
3d) I position the drill into the depression on the hearth board, and place the bearing block on top of the pointed end of the drill. Ensure the drill is vertical and held firm. With the bearing block holding the drill in position and applying downward pressure, I then move my right hand to hold the end of the bow closest to my body.
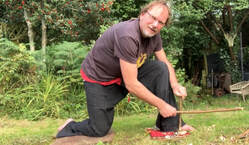
4) I then start moving the bow backwards and forwards, to spin the drill, applying pressure down onto the bearing block. I start slowly then increasing in speed but not too fast - just steady rhythmic strokes. You want to try and keep the bow parallel to the ground at the same height so that the cord doesn't move up or down the drill too much. You want the cord to stay in the same position as much as possible ! You need to steadily push and pull the bow rather than jagged movements. This may take a few practices as starting a new hole is a bit trickier. Once you've formed a burnt circle the width of the drill, stop, and put down the bow, bearing block and drill.
|
5) You now need to cut an V notch about an 1/8th of the circle, to stop just before the middle - this is to allow the dust to fall onto the ember tray. Try to get the notch centred and as symmetrical and neat as possible - it doesn't have to be perfect but too big and you have less surface area and the drill may slip out, too small and dust will not be able to form into an ember as easily. If you cut the notch into the centre then a "nipple" can form on the end of the drill.
(There are also notchless methods as well but a notch works best!) |
6) Place the hearth board with the notch facing you (so you can see the dust\ember forming), and place the ember tray underneath the notch. Have your tinder bundle within hand reach but not so it's in the way. Now get back into position as per step 3.
7) Start bowing again (as per 4.) I start slowly and then increase speed to a steady rhythm - you don't need to bow fast - try to use the whole length of the cord . Keep bowing to build up the dust pile so that it is touching the base of the spindle and then to increase speed. The hot tip of the spindle touching the dust pile helps ignite the ember - so you don't want the board too thick as it will take longer to fill up the notch with dust.
With the bow drill, a steady rhythmic action works - you shouldn't need to exhaust yourself! With the right wood combination, I can usually create an ember within a minute. . The longer you can go for, then the larger the ember. Some woods are easier to get an ember than others. You may need to alter the amount of downward pressure and speed, if the dust is too light in colour or the drill starts squeaking then apply more pressure (it is polishing) - if the dust is chunky then you may need to take pressure off.
This is all about practice and what works for you but a steady rhythmic pace with good pressure works well.
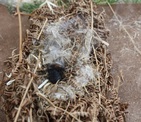
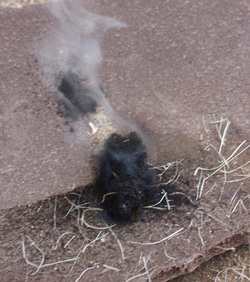
9) Carefully place the ember in the middle of the tinder bundle on top of the fluffy tinder. (you can use your knife to do this or carefully tip it in.) Be careful not to break it up - you ideally want it to stay as one piece.

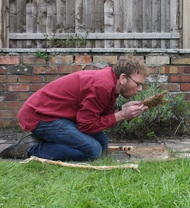
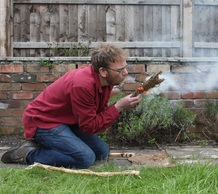
Keep blowing. It should start to smoke and then hopefully, whoosh, it bursts into flames! Congratulations! You have welcomed the ancestral fire! You can now place in your fire pit and feed the ancestral fire with very small kindling before adding larger sticks.
Note: You don't always need to start at step 1 - I can usually get a few embers from each divot (.e. start at step 7) depending on type of wood and thickness.
Just keep practicing - the below video follows on from Part 2 where I revisit the set which didn't work in Part 2.
Tips\Pointers\Troubleshooting:
There is no one hard and fast rule with the bow drill, and there are many factors which can affect it. The main thing is experimenting and finding a technique which works for you.
Also see this blogpost article "A Year of Bow Drill Experimenting" going into more detail about various alternative techniques.
1) Don't expect to coax the ember first time ! It takes practice. Don't worry about creating an ember at first. Practice on technique. Once you are confident with the technique, then you can start working on getting that ember! Even now , somedays I find it a bit more difficult than other days, so I stop and review what I'm doing and check the setup.
2) It is best to practice on a firm , even, flat surface ; and in a sheltered space (no wind or rain.) I have successfully used the bow drill on a slope, in long grass, with a breeze, surrounded by midges - not recommended but possible!
3) You need as little friction at the top of the spindle - if the top of the drill is getting hot/smoking then you need to review your setup as you have too much friction at the top so it won't work. You need all friction at the bottom - the issue maybe with the bearing block or the spindle is too soft. Use a limpet shell or stone.
4) If it's difficult to move the bow, then make sure the top of the drill is pointed enough and not catching on the bearing block. Ensure the cord is tight enough and not snagging. Check the drill is smooth with no snags. The other issue could be that the drill is too wide. I prefer about 15mm-20mm max.
5) If the drill keeps slipping off the hearthboard: If you're just starting a new hole ensure you've cut a deep enough depression. Also apply more pressure on the bearing block. To start a new hole, I usually start with small movements and steadily increase. It comes with practice.
6) If you are just getting dust that isn't forming an ember then you may not have enough friction at the bottom - try increasing pressure on the bearing block. If the powder is light brown in colour and dusty, then you may be going too slow and not applying enough pressure. If the colour of the powder is too light but the consistency is correct, then you may be going too slowly. Also, if the colour is right but the consistency is that of little rolls of fibre, you might be going too fast or not pressing down hard enough on the bearing block. If you are getting the right colour but the powder looks crusty, then you might be going too fast, pressing down too hard, or both. Also, try different wood combinations - the nature of the wood also makes a huge difference. Have a look at the wood combinations under Principles for some guidance.
7) I find it easier if the drill is on the outside of the cordage - i.e. the cord is between the drill and the bow otherwise the drill may knock against the bow. It can still work but I find it easier with the drill on the outside.
8) Cord slipping - you need to tighten the string and have it as tight as possible, you should have to apply some pressure to straighten the drill. It could also be that the cord is too stretchy. When learning use something like Flax cordage. Another tip is to use at least 2-3 twists of the cord.
9) Squeaky drill - Try applying more pressure on the bearing block . Once things get warmed up the squeak should disappear if you have enough downward pressure. It can also be caused by a polished drill - especially if you've used it for a while. A polished drill will reduce friction. You can either try adding a lot more downward pressure onto the bearing block, or add a bit of grit\dust into the hole, use a knife to rough up the surface
10) The cord keeps wearing out and breaking: You need a stronger cord (!), or it maybe that the cord is too loose, or if natural it is fraying. Or try wrapping the cord multiple times around the drill.
11)If you aren’t getting any smoke, don’t stop but instead add pressure and bow speed. Or it could be due to the nature of the wood being used e.g. it is damp - if you are getting lots of smoke but no ember it could indicate damp wood and the smoke is a mixture of steam!
12) Can't light the tinder - the tinder needs to be dead and bone dry. Check the ember isn't get smothered, and experiment with your blowing!
13) Don't give up - keep practicing ! It can be frustrating but very satisfying when you get that first ember and more satisfying when the tinder bundle bursts into flame and you welcome the ancestral fire ! (It took me a few attempts, to get the tinder to light.)
14) If you do get stuck, then ask others for advice - I'm happy for people to contact me. I think the main challenge is finding the right materials which work together - and keep practicing!


