Principles of the Bow Drill
Overview of the Bow Drill
I recommend learning the Bow Drill first for coaxing the ancestral fire by rubbing sticks and then to explore and experiment with different woods and cordage, before moving onto other friction methods. Below I describe the principles in further detail. In sacred practice it's all about doing it with awareness and intention and using natural materials. Its not about how quick and fast. You don't have to do it on your own. You can work with others!
Updated Oct-23: This section had got very out dated! I've also added a video of a few tips that would have been good for me to know when I first started learning the Bow Drill.
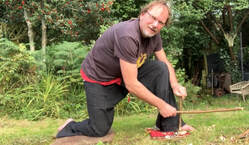
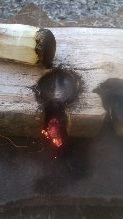
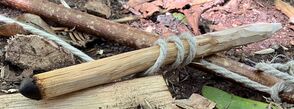
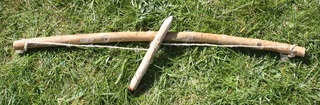
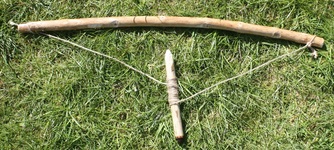
The drill is twisted into the bow cord and secured between the hearth board (at the bottom) and the bearing block (at the top.) The pointed end of the drill fits into a hole in the bearing block and the blunt end onto the hearth board, close to the edge of the board (facing you.) Downward pressure is applied on the bearing block. I keep the setup secure by placing my foot on the hearth board and securing my arm which is holding the bearing block tightly against my shin (or knee) as shown. The bow is steadily moved backwards and forwards starting slow then increasing in speed (but you don't need to go furious), making the drill rotate and rub against the hearth board causing friction. A "V" notch is cut in the burnt depression formed by the drill on the hearth board, where dust collects onto the ember tray and fills the notch and the bottom of the drill will further heat the dust. Hopefully the dust eventually ignites and begins to smoulder, this ember (or embryonic fire!) is then added to the tinder bundle and breathed into fire!
See below for more information on the principles and see Method for step by step instructions of using the Bow Drill.
See below for more information on the principles and see Method for step by step instructions of using the Bow Drill.
|
Note on Measurements: I don't measure, and do it by eye - but I have included measurements for reference!
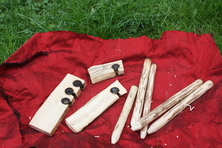
The Bow Drill Set
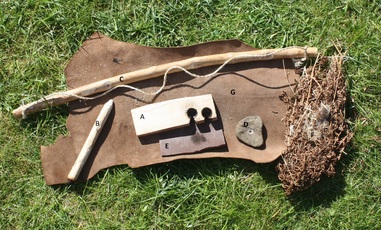
My bow drill set includes the following:
A) Hearth board
B) Drill
C) Bow with natural cord
D) Bearing block
E) Ember tray
F) Tinder Bundle
G) A piece of leather to go underneath the hearth board - this is my addition to keep the hearth board free of any debris/long grass and useful if ground is damp. I also use it to wrap the kit up in.
A) Hearth board
B) Drill
C) Bow with natural cord
D) Bearing block
E) Ember tray
F) Tinder Bundle
G) A piece of leather to go underneath the hearth board - this is my addition to keep the hearth board free of any debris/long grass and useful if ground is damp. I also use it to wrap the kit up in.
Tools&Skills
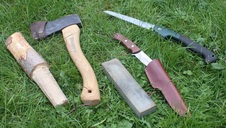
Useful tools for making a bow drill set :
Once you are more skilled you may like to experiment and try and make a set with stone tools to connect on an even deeper level. - see this blog post.
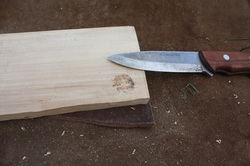
- A good sharp solid bush craft knife with sheaf (not a folding knife), and a sharpening stone.
- A small hatchet may be useful for larger pieces of wood.
- A good solid piece of wood (baton) for batoning the knife\hatchet into the wood to help make the hearth board.
- A small saw for sawing wood to correct length - I use a small folding saw. I started with a one from the supermarket, which cost about £4 and did last a couple of years. I now use an Opinel 18 which I prefer as it has a wooden handle.
Once you are more skilled you may like to experiment and try and make a set with stone tools to connect on an even deeper level. - see this blog post.
Wood Combinations
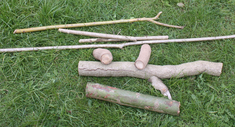 Ivy, Hazel and Willow in various states of seasoning.
Recommended wood for bow drill is medium-hardness - you should be able to make an indent with your fingernail. Too soft and it will disintegrate, too hard and you get polishing and not much dust - some hard woods do work, they may just need a bit more preparation and a lot more downward pressure.
The wood needs to be dead and dry, but not decaying and it's best to look for dead standing wood. I don't cut live trees. You will need to let "green wood" dry and season which can take a few weeks/months.
The wood needs to be dead and dry, but not decaying and it's best to look for dead standing wood. I don't cut live trees. You will need to let "green wood" dry and season which can take a few weeks/months.
 A selection of drills and hearth boards.
I use wood is native and preferably local.
I prefer Hazel as it is common within British Isles, works on various woods, usually grows straight, can easily be found in the desired thickness and needs little work. Willow is good for similar reasons. I recommend Hazel or Willow for all components of the set when starting. The combinations I've had success with, so far are:
Easier combinations:
- Hazel spindle on Hazel hearth
- Willow on Willow
- Hazel on Willow\Lime(Tilia) \Ivy\Poplar
- Willow on Ivy - for Ivy - Look for fallen mature trees which may have an ivy attached to it. It also needs to be dried out well, and best if you take the bark off and carve it into hearthboards before drying and store in a dry place.
- Hazel on Ash; Ash on Ash
- Silver Birch on Silver Birch ;Hazel on Silver Birch
- Hazel on English Oak
- English Oak on Oak - Oak needs preparation as it needs to be very dry and requires a lot more downward pressure as it polishes very easily. (see blogpost here.)
 Willow on Willow Willow on Willow
Other combinations, native to the UK which others recommend :
Pine on Pine (Scots Pine is the only native Pine in the UK.) I have successfully used Hazel on non-native Pine which worked well. I've also seen Alder and Beech mentioned - I found Beech to be too hard and polishes very easily, I've not yet tried Alder. |
Hazel on Hazel
|
There are many different wood combinations and hearth and spindle does not have to be sourced from the same tree - except for Oak! I do find Oak works better if hearth and spindle are sourced from the same tree.
Once you've learnt the Bow Drill and are confident then it is good to experiment with different woods (and techniques) - but you may have a preference for use in ritual (e.g. I prefer Oak)
Once you've learnt the Bow Drill and are confident then it is good to experiment with different woods (and techniques) - but you may have a preference for use in ritual (e.g. I prefer Oak)
The Hearth Board
 Lime hearth board
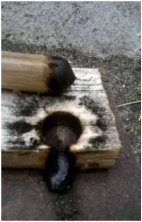
Cut a section of branch/log at least 20cm-ish in length (so you can comfortably place your foot on the board) at least 4cm wide (at least twice width of spindle.) The main advantage of a longer board is that you can tempt more embers out of it, without having to keep making a new board! Preferably with few knots. Stand the log on one end, and using a bushcraft knife or small hatchet, baton off one side, then the next. I recommend to carve Ivy and Clematis as they don't split straight. Try to carve both sides flat so the hearth board resembles a plank -and lies flat on the ground. I prefer it to be about 2cm thickness. If it's too thick it takes longer to fill the notch with dust - as you want the base of the spindle touching the dust to help ignite it. Too thin and you may wear through the board too quickly before coaxing an ember.
You will need to make a small hole (divot) which you can place the base of the drill in, to get started so the drill doesn't slip . I prefer the edge of the drill to be upto about 5mm away from the edge of the hearth board.
The notch in the hearth board will be made, once you have burnt in the board - this will be explained in the "Method" section.
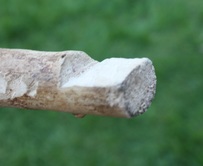
The Drill / Spindle
|
The drill needs to be as straight as possible and knot free as possible.
I strip the bark off. Smooth off any bumps/notches which the cord could snag on. Carve one end pointed and the other end blunt and slightly rounded off at the edge. My drills are usually about 15mm in thickness and about 25-30cm in length. The base of the drill should be carved so it is rounded off (not pointed) The top of the drill should be tapered to a point - preferably a long thin point |
Spindle
|
The Bearing Block
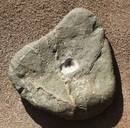 Stone bearing block
The bearing block is to hold the drill in place, at the top and allow it to spin freely with little friction.
I recommend a Limpet shell (use a piece of cloth over the top) or a stone with a natural hole\indentation. You don't need a large hole, just enough to stop the drill slipping around. Bone and antler can also be used. A thick piece of leather also works very well! Ceramic egg cups and shot glasses work too! You can also buy bearing blocks too - so for ritual you may have a special one you like to use.
The bearing block needs to be large enough to hold comfortably in your hand, without your fingers getting in the way of the drill.
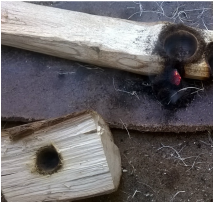
Wood bearing blocks do work - it's best to use a very hard wood like blackthorn, hawthorn or holly. I cut a small section off a medium branch and split it in half so it fits comfortably in my hand. I then make a small hole in the centre (see left.)
You can lubricate the hole in the bearing block with bee's wax or chewed up green leaves.
You can lubricate the hole in the bearing block with bee's wax or chewed up green leaves.
The Bow

I recommend to start with a bow as long as your arm and about 15mm-20mm in thickness. The longer the bow then the more spins per stoke are achieved - each time you change stroke the drill will temporarily stop to reverse so the longer the bow the better. You are restricted by the reach of your arm hence why it is suggested to use a bow the length of your arm. Smaller bows can work - you just get less spins of the drill per stroke and can take longer.
You can either use a springy bow or a solid bow. A solid bow will require a bit more adjustment of the cord to get the tension right (an adjustable knot is good). With a flexible bow, you don't need as much slack and can use the flex of the bow (by bending it) to get slack in the cord to twist the cord around and the flex of the bow will then tighten the cord.
To learn I recommend a solid bow with a slight bend - it doesn't need to be overly bendy! I find a straightish bow easier!
You can carve and decorate the bow too!
I use a simple notch (see picture ) at each end, to tie the cord.
Cordage
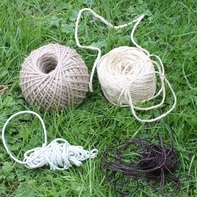 Jute (top left), Sisal (top right), Leather (bottom right) and Lawn Mower Starter Cord (bottom left)
I recommend natural 5-6mm Flax Linen cordage (you can buy it off ebay.) Flax linen is strong and doesn't stretch as much as other natural cords, and I have successfully taught many people using this type of cord. I do not advocate synthetic cord !
Cords which stretch or fray will lose tension which will make the drill slip - a flexy bow or wrapping the cord multiple times can help against this . I recommend to use shop bought ready made natural cords when learning!
For making your own cords, there are various natural materials from which you can make the cord, such as, buckskin, rawhide, sinew and plant fibres (e.g. lime bast, nettles and flax.) There are various articles on the internet explaining how to make natural cordage. This is a very good article for making nettle cordage. I have successfully made and used nettle cordage since 2016 and prefer to use Nettle cordage in ritual.
 Sisal cord wrapped twice around drill
When stringing a solid bow, the cord needs to be slightly longer than the bow so that it can be twisted around the drill (I twist at least 2-3 times ) and is taut when the drill is vertical. You may need to adjust the cord until it is just right - so using an adjustable knot at one end is advantageous. Start with the cord one and a half times the length - cut off any excess so it doesn't get in the way. With a flexible bow, you can use a shorter length - a little longer than the length of the bow.
 Jute cord wrapped multiple times around drill.
With thin\weak cord you can wrap the cord multiple times around the drill (at least 8), and you don't need the cord as tight. This helps prevent the slipping cord issue. This works well with thin cords as there is less pressure on the cord. I've successfully used household string, a thin leather cord and Jute cord using this method - both easily fray and snap using the 2 twists.
Ember Tray
I place a leaf or piece of bark or even a small piece of leather underneath the notch in the hearth board to collect the dust\ember.
You can also use a thin piece of wood or paper/cardboard or make a leather ember tray to use in ritual.
You can also use a thin piece of wood or paper/cardboard or make a leather ember tray to use in ritual.
Tinder Bundle
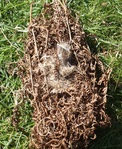 Bracken and Willowherb tinder nest
The embryonic ancestral fire (ember) needs to be fed with tinder and breath! I make a tinder bundle out of either dead dry grass or bracken lined in the middle with fluffy seed heads (Rosebay Willowherb and thistle down) to extend the ember. The tinder needs to be dead and. bone dry and combustible! also works.). Late summer is the best time to collect your tinder, and I usually collect a large bag of it to last through the year since you can't always rely on finding dry tinder in the UK.
There are other materials which work well such as Honeysuckle and Clematis bark which can be buffed into a fibrous tinder bundle. I like to make a good sized bundle, if you have enough material why skimp!
There are other materials which work well such as Honeysuckle and Clematis bark which can be buffed into a fibrous tinder bundle. I like to make a good sized bundle, if you have enough material why skimp!

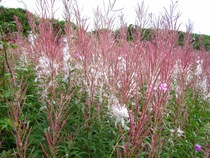
Rosebay Willowherb - very common throughout the UK countryside. Picture on the left shows it in flower, and on the right shows the fluffy seed heads and throngs.
|
|
Putting it All Together
Now you have all the components, you are ready to start using it! See the Method page for a step by step guide.
Also see this blogpost article "A Year of Bow Drill Experimenting" going into more detail about various alternative techniques.
Also see this blogpost article "A Year of Bow Drill Experimenting" going into more detail about various alternative techniques.
Please note, it took me quite a few months to learn to make and use the bow drill. Mostly because it took me a while to find all the materials that worked for me:
- finding and sourcing the matching wood combinations of drill and hearth board: I recommend Hazel or Willow for all components now
- the bearing block: wood caused too much friction and I couldn't find any "very hard" wood. My first success was with a Limpet Shell
- the cord - string broke too easily; other cords were too stretchy. Flax cord is my recommendation for learning.
- a solid bow - I couldn't keep the tautness of the cord on the drill with bendy bows; and my early bows had a tendency of snapping under pressure. I then settled on a nice solid 15-20mm thickness bow with a very slight curve. . However, flexy and bendy bows have their advantages and can work.
- connecting the drill to the cord - I found that with one loop\twist, the drill kept slipping so I went for 2-3 which worked a lot better.
- tinder - since I was also learning about starting fires with tinder, this took a few experiments ! When I had got to the point where I could create an ember, I found that I couldn't light the tinder! My preference for a tinder nest is bone dry dead grass or bone dry dead bracken, with fluffy willowherb seed heads inside to extend the ember.
- and of course knowing how to build a fire and keep a fire lit helps!