Fire Plough - Fire Plow - "How To" article
Updated: October 2023
|
Overview
The Fire Plough / Fire Plow / Stick and Groove is most likely one of the earliest friction methods attempted by our ancestors, due to technical simplicity i.e. literally rubbing 2 pieces of wood together! I find it very primal (see above)! I haven't yet used it in ritual but I do find it a very primal way and can see how it could be used in sacred practice for connecting with one self on a more primal level. It is commonly used throughout Polynesia and has survived within that indigenous culture. In Māori it is called Hika Ahi. The Samoans make it look very easy and I watched this video many many times to learn the technique. The fire plough is also mentioned in the Polynesian Maui legends. where Maui steals fire from the fire goddess Manuka. This is also an interesting article on the Polynesian methods. |
|
Although simple technology wise, the Fire Plough is commonly seen to be one of the more difficult friction methods in the UK (and temperate environments) , and there has been little information available on using this method in the UK which is why I first put together this article followed by various YT videos and Insta posts.
The Fire Plough can be possible in the UK , you don't need to be muscly (I'm not!) but it can be a bit of a finickity method and you need to have the right materials, practice and refine the technique and have patience! It had taken me many many attempts over 3 or 4 years to achieve my first plough ember in 2020! I kept giving up but always coming back to it, to give it another go as I knew a few people had achieved it in the UK. I watched as many videos as I could (especially the one above) to get a few tips. This little bit of knowledge and perseverance eventually paid off!
I will continue to update the page and share new knowledge as I learn more, as there is always something to learn! Fire Plough like friction fire is a journey!
Below is my latest video tutorial made in September 2022, where I share "what I've found works best for me in the UK" so far.
This is what I've found works best for me - others may prefer a slightly different technique.
Since June 2020, I have practiced over many hours and honed my technique and become more consistent and I am now often able to succeed on the first attempt. However, for me it's not important how quickly one does it, it's more about the connection and honouring the ancestral fire, and working with the wood to coax out the fire, and like the hand drill I find this method quite profound in that it's just you and the wood and your hands, and when kneeling it's as it you're praying and bowing to the fire gods :) I find the fire plough very primal.
With the knowledge and right materials and honing of the technique, the fire plough can be a very effective technique, and unlike the bow drill there is little technology, and unlike the hand drill there is less risk of damaging your hands with blisters. It's my favourite method (after the fire churn!)
A Few Pointers:
Wood Combinations:
The combinations that I have successfully used within the UK are:
I recommend using the same piece of wood for blade and hearth for Poplar and Lime as I have found this to be the most effective in the UK - the blade and hearth will be of the same composition and density and also you just need one piece of wood! The blade can be battoned/carved out of a section cut off the hearth.
In other parts of the world try these woods : Linden/ Basswood (Tilia same family as UK Lime); Cottonwood (Populuus - try other trees of that species e.g. Quaking Aspen); Sotol; Malayan Cherry (this works fantastically and I've been lucky to have been gifted some); Incense Cedar; Yellow Mombin; Coastal hibiscus (Hibiscus tiliaceus) ; Kaikomako; Māhoe; Embaúba. Buckeye/Horse chestnut is apparently supposed to work but I've not tried that yet (tho it is not uk native)
Wood Condition
I have found if the wood has any decay setting in (even slight) it will not work with the plough as the fibres don't get a chance to get hot enough before being rubbed off. I recommend the wood to be seasoned (not green) and VERY DRY and to be kept DRY. The plough seems to be very susceptible to moisture and wood which becomes damp (even if dried out) may become difficult to use with the plough and the plough can be more difficult when there is alot of moisture in the air.
(The exception to this seems to be ivy which does seem to work well if a little decay has set in but then dried thoroughly out and kept dry)
The combinations that I have successfully used within the UK are:
- Lime blade on Lime base (Tilia genus same as Linden and Basswood) and Poplar blade on Poplar base - I now recommend these two as the most effective/consistent combinations in the UK based upon my own experience
- Willow or Poplar blade on Lime can work too
- Hazel or Lime blade on Poplar base (Populus, same genus as cottonwood) - Lime and Hazel can also work. I have used Ash successfully but not as easy as the others.
- Lime, Willow, Elder (sambuca nigra), Ivy on Ivy (hedera helix) - these combinations can work and produce a good ember but it does depends on the ivy and moisture levels as Ivy does suck up moisture - sometimes it works well but other times I’ve really struggled with it even with a set which has worked previously. Contrary to my advice on other woods, ivy seems to work once a bit of decay has set it then thoroughly dried out.
- Lime or Poplar on Clematis - Clematis can work as a hearth board with Lime and Poplar as the blade
- Lime or Elder or Willow on Willow - I had some success with these blades on Willow hearth. I've had very mixed results with Willow and find it very inconsistent. I need to do more experimentation with Willow as the willow hearth I have no longer works due to getting damp.
I recommend using the same piece of wood for blade and hearth for Poplar and Lime as I have found this to be the most effective in the UK - the blade and hearth will be of the same composition and density and also you just need one piece of wood! The blade can be battoned/carved out of a section cut off the hearth.
In other parts of the world try these woods : Linden/ Basswood (Tilia same family as UK Lime); Cottonwood (Populuus - try other trees of that species e.g. Quaking Aspen); Sotol; Malayan Cherry (this works fantastically and I've been lucky to have been gifted some); Incense Cedar; Yellow Mombin; Coastal hibiscus (Hibiscus tiliaceus) ; Kaikomako; Māhoe; Embaúba. Buckeye/Horse chestnut is apparently supposed to work but I've not tried that yet (tho it is not uk native)
Wood Condition
I have found if the wood has any decay setting in (even slight) it will not work with the plough as the fibres don't get a chance to get hot enough before being rubbed off. I recommend the wood to be seasoned (not green) and VERY DRY and to be kept DRY. The plough seems to be very susceptible to moisture and wood which becomes damp (even if dried out) may become difficult to use with the plough and the plough can be more difficult when there is alot of moisture in the air.
(The exception to this seems to be ivy which does seem to work well if a little decay has set in but then dried thoroughly out and kept dry)
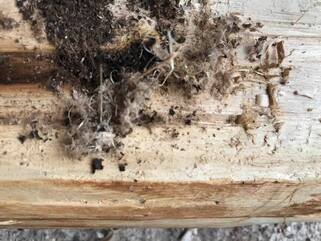
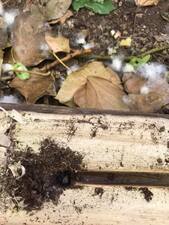
I was lucky on the piece of Poplar I originally chose in 2022 where I succeeded with my first ember using a Hazel plough, it was as if my hand was guided to it - I had used it 2 years earlier and I couldn't get past the polishing - I guess it wasn't seasoned/dry enough and I hadn't honed my technique enough to apply enough pressure. What I first observed with the Hazel and Poplar set, is that the dust was (sometimes) fibrous \ fluffy (see photo) and so easily rolled along the board; sticking to each other and rolling underneath the stick so getting heated up with the friction and then igniting.
The Hearth / Base Board
The part of the tree that is used for the base can make a difference with the plough, due to the density and make up of the wood. I've found smaller diameter (younger) branches don't work well and branches with a diameter of at least 8cm work better and I simply just carve flat the base and top.
I prefer the hearth long enough so I can comfortably kneel on it and stop it from moving (or if short, anchor it using a heavy object such as a log). The hearth needs to be firm on the ground and shaved flat on the top and preferably no knots (so it is easy to push and pull the stick over the surface.) You don't want the board moving as that affects the pressure you can apply. I prefer the wood to be fairly thick so I can get quite a few attempts out of one piece. Too thin and I'll soon work through the wood.
Each time, before I start, I shave the top / sides of the groove flat so there is only a very shallow groove, otherwise a deep groove will slow down the ploughing motion. It find it works best if most of the friction is at the bottom and not at the sides of the blade.
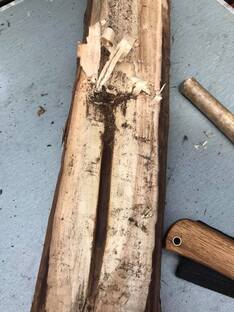
I prefer to carve wood curls (see picture) at the end of the groove which stops the blade in the same spot and also so the dust can collect together and not fall off the board (I find this really helps. )
The part of the tree that is used for the base can make a difference with the plough, due to the density and make up of the wood. I've found smaller diameter (younger) branches don't work well and branches with a diameter of at least 8cm work better and I simply just carve flat the base and top.
I prefer the hearth long enough so I can comfortably kneel on it and stop it from moving (or if short, anchor it using a heavy object such as a log). The hearth needs to be firm on the ground and shaved flat on the top and preferably no knots (so it is easy to push and pull the stick over the surface.) You don't want the board moving as that affects the pressure you can apply. I prefer the wood to be fairly thick so I can get quite a few attempts out of one piece. Too thin and I'll soon work through the wood.
Each time, before I start, I shave the top / sides of the groove flat so there is only a very shallow groove, otherwise a deep groove will slow down the ploughing motion. It find it works best if most of the friction is at the bottom and not at the sides of the blade.
I prefer to carve wood curls (see picture) at the end of the groove which stops the blade in the same spot and also so the dust can collect together and not fall off the board (I find this really helps. )
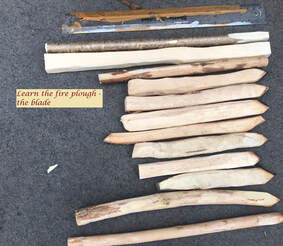
The Blade \ The Plough \ The Stick
|
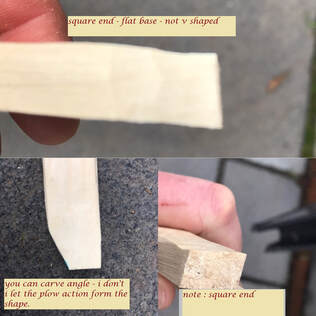
What I have found worked for me, is a blade about 10mm in width at the tip squared off. Made from either a straight branch of similar diameter or battoned/carved from piece of wood cut off the hearth and shaped into a uniform cuboid. The blade needs to be as straight as possible. I carve the tip to about 8mm to 10mm in thickness. See pictures for an idea of how I carve the blade tip. The tip will find it's own shape once you start ploughing. You don't want it too thin as it will just carve through the base too quickly. Too wide, and it'll be harder to get the pressure.
I prefer the tip in contact with the hearth to be 1cm or so long - I alternate turning the stick over so that I have an angled blade on each side, which stops the blade becoming too long, and having too much wood in contact (see 2nd picture.) I find it works best if the end of the blade is squared (not pointed) as this will push the dust more forward rather than off to the side. (Sometimes though I do use a narrow angle and have more of the blade in contact.) I also find it best if the blade in contact with the base is flat - not v shaped as that will dig deeper into the wood. Before each attempt, it's good to make any alterations to the blade as necessary e.g. if it has got shorter and I'm now into the thicker part of the stick then I carve more away to thin it out again. |
|
Length wise - I prefer it to be at least 30cm in length . If you have large hands then you may want a longer stick. I don't want it too long otherwise it may get in the way (poke myself in the chest\face!) Using the overhand grip, I've found it works better if the end of my fingers are at least 5cmish away from the tip, you don't want to be too close or too far away. Also I want to allow for the blade to get shorter over time, so I want to ensure the blade is long enough otherwise I'll be replacing it frequently. I have got through quite a lot of hazel rods in the last couple of weeks!
I prefer the blade to be straight otherwise I won't be able to plough in a straight back and forth motion and I remove any knobbles/bumps etc and round the edges off so it is comfortable to grip (I find a comfortable blade makes a huge difference in applying pressure otherwise it can hurt and prevent you from applying as much pressure.!)
The below clip demonstrates the blade shape and alternating between sides.
|
The Hand Grip and Posture
I use the "Polynesian" (as I call it) or "overhand" hand grip as can be seen in my clips, as I can apply good pressure and use my shoulders and body weight more rather than just my arms. Watch the 2022 tutorial where I demonstrate the grip. As can be seen in this clip, I've found it best if I position myself so I'm far enough away that my body weight is applying (falling) down onto the blade. I've found this position to be best for me and allows me to apply a lot more pressure. I've found pressure is key with the fire plough and I need to apply as much pressure as possible. |
|
When positioned like this and combined with the overhand grip, I find bouncing on my haunches can really help with the momentum, and I sometimes find myself doing this anyway, without thinking about it - it kinda helps propel your shoulders and arms forward and so you have more bodyweight and because I'm not solely using my arms it is far less tiring and I can go far longer and apply more pressure. Though you may look like a nodding dog as in this clip :)
I've also found that if you're further away you can raise off your haunches and really put your body weight behind it, and this really helps with the pressure and is less tiring. I find it difficult and tiring just using my arms, and that's where I was going wrong. It does take a bit of practice to get used to this posture, but it really has been a game changer for me. And downward pressure (as well as speed) is key to succeeding - you need to apply as much pressure as possible.
I've also found that if you're further away you can raise off your haunches and really put your body weight behind it, and this really helps with the pressure and is less tiring. I find it difficult and tiring just using my arms, and that's where I was going wrong. It does take a bit of practice to get used to this posture, but it really has been a game changer for me. And downward pressure (as well as speed) is key to succeeding - you need to apply as much pressure as possible.
Environment
Practice in a sheltered spot. Wind is not good for the plough as the dust is exposed on the board and the wind just blows it away!! As with all other methods, rain and water is not good but I also find it can be more difficult when there is a lot of moisture in the air.
It's also best if the ground is frm (not soft) as with soft ground the pressure you apply will got through the board into the ground below - with hard ground the pressure will go into the board more.
I find it best if the board rests flat and does not wobble or move around, and best to be horizontal rather than pointing up or down hill (tho some prefer it slanting downwards slightly), and be comfortable in the kneeling position.
The key is being able to apply A LOT of pressure and this is easier if the board is solid (not moving at all) and on firm ground.
The Method
The videos on this page demonstrate the methods well. I angle the stick so the flat end of the stick moves along the board, pushing and pulling it about 6-8cmish along the board, starting and finishing in roughly the same place. I prefer not to have too long a track\groove otherwise the track will have time to cool and too short- I find I lose momentum by constantly changing direction and it can be more tiring. If everything comes together, then it can be possible to tease out an ember in under a minute of ploughing (and nowadays usually under 30 seconds)
To start off, I don't carve out a groove, I just start by pushing and pulling the stick along starting with small strokes and slowly extending out - if it keeps getting stuck then I use my knife to smooth out the knobbly bits. If they are just little bumps then I should be able to firmly push through them with the stick. Avoid knots! If it is a new groove, then after a few goes of burning in a track, I'll then carve up wood shavings at the end of the groove so the dust can collect together where it can form an ember. Sometimes, it can take a fair bit of effort to get through the polishing on a new groove even with soft woods - when learning you may be tempted to give up but persevere, rough up the wood if needed - once you are through the polishing, it gets easier!
For soft woods, I prefer to use a low angle to start, so more of the blade is in contact to bed in the groove without carving deep, after a while and once the dust pile is building up I will steepen the angle of the blade (less surface contact.) This will focus the friction in a smaller surface area of the blade and I will then apply more speed (the steeper angle can dig deep quickly so I tend to just finish with a few strokes of the steeper angle).
I find I need to exert as much downward pressure as possible. I find maintaining a steady rhythm for about 20seconds and as more smoke appears I apply more pressure and increase speed and go for as long as I can still applying pressure, maintaining a rhythm. I try not to be tempted to shorten the strokes too much as this can work against me.
When I see smoke coming from the dust, I try to go for a bit longer and try not to smash into the dust pile, and increase speed on the final few strokes. Changing the angle of the stick to a more steep angle on the final few strokes can help and is easier to do with a longer stick. As I mentioned earlier, raising off your haunches (if kneeling and if you are far enough back) can really help with the downward pressure.
If there isn't an ember, I take a short rest before trying again! I may need to trim the sides of the groove to flatten it a bit, and check the blade to see if that needs a trim, and check my posture and hand grip.
If I stop creating dust, but there's still smoke, then there may be polishing (especially when starting a new groove), so I rough up the groove with my knife a bit and also rough up the blade. Sometimes I've stripped the blade right back to fresh wood which has helped. The polishing also indicates I'm not applying enough pressure.
If you only have light brown dust then it may be that you aren't applying enough pressure or the wood is too soft.
You just need to practice and experiment, it may take several weeks of practice before things fall in place.
I find that at times, I need to experiment with speed Sometimes a steady speed is key (e.g. with Willow on Ivy or with slightly damp woods) and at other times I need to apply lots of speed. It's all about experimenting. Pressure seems to be key!!
The next clip shows a close up of Hazel on Poplar fire plough - you can see the dust fibres building up in this clip...(this is one of my earliest plough embers in 2020)
How do I know when I have an ember ? Good question! When I see the dust darkening and piling up and there's lots of smoke then I try to keep going until smoke starts to rise from the dust pile which is an indication I have an ember (I try to go a bit longer if I can and have a final sprint!) I may be creating so much smoke that it may look like the pile is smoking but once I stop and things settle down, the smoke clears and I may just have a dust pile! Sometimes once things have settled down after stopping, the smoke is quite noticeable from the dust pile, other times there has just been a faint wisp (which needs some gentle coaxing) or there is nothing (which for me is mostly due to the dust being too coarse\chunky which may be due to pressure\speed.)
Sometimes it helps by gently turning over the dust pile (if there is only a gentle whisp) as the ember could be trapped underneath the dust pile and doing this helps get air to the ember.
Tapping the side of the hearth with the blade can help jiggle the pile and allow air into the ember as the ember can get smothered, gently blowing on the ember can help too but don't blow too hard and try to ensure it is dry breath.
The videos below show how effective the fire plough can be in the UK using Tilia and how effective the fire plough is using woods such as Malayan Cherry which can be found in more tropical areas and has a much lower combustion point....
|
|
|
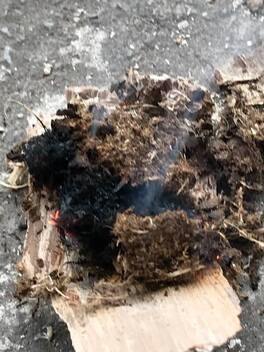
The Ember
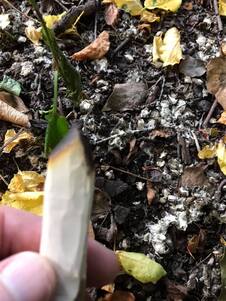
Many of my successful attempts have been quite noticeable in that the smoke has been puffering from the dust pile. A few embers have been the opposite. Once the smoke from the ploughing had settled there was only a faint wisp of smoke which I could easily have discounted but with some encouragement I breathed life into the dust (I used the end of the stick to gently hold the dust down so it wouldn't blow away)
Sometimes, when there has just been a wisp, the ember has gone out. I think this is due to
a)stopping too soon which is why I try to continue for a bit longer and really ramp up the speed when I think there could be an ember (without smashing up the dust pile!)
b) the dust has been too chunky (which may be due to speed\pressure)
I let the ember develop a while before transferring to the tinder bundle
Taking the Ember to the Tinder Bundle
Once I have the ember, I need to carefully move it onto the tinder bundle. This isn't as easy as with the bow drill \ hand drill where the ember forms on an ember tray, and I could quite easily lose the ember at this point!
As I mentioned above the ember can be quite delicate, and it's best to leave the ember for a while. There should be plenty of dust on the board which I can add to it. Carefully wafting it a little \ blowing on it, will help it develop, I want a strong ember before attempting to place it on the tinder pile. I could also add some extender (e.g. willowherb seeds heads) ontop to make it even larger. The last thing I want after all the effort, is for the ember to go out or to get lost!
Look after the baby fire! Feed it!
The ember can stick to the board so gently prise /loosen the ember from the board first. I place the bundle (with ember extender) upside down ontop of the ember and then rotate the whole thing over so the bundle is now underneath and the board ontop so when I remove the board the ember is now in the bundle! You just don't want to lose that ember after all that effort!
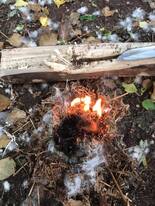
Welcoming the Ancestral Fire!
Like with all other methods, once I have added the ember to the bundle, I then breathe life into the ember, and breathe it into flame!!
Blessings on the ancestral fire!
Like with all other methods, once I have added the ember to the bundle, I then breathe life into the ember, and breathe it into flame!!
Blessings on the ancestral fire!
Just give it a go!
It can be a very frustrating method to learn, but it is very satisfying when you finally see the smoke continue to rise from the dust pile. This is a simple and humbling friction method but takes takes perseverance, a lot of practice, a lot of patience, refinement of technique, a bit of trial and error, maybe a bit of luck and a bit of zen :) You don't need to be super muscly , and if things aren't working review your technique, your materials, your position and posture.
Good luck on your friction journey!
Good luck on your friction journey!
Fire Plough Instructional Video
The below video is my updated 2022 Tutorial.
I also share hints and tips on my IG and Youtube channels.
The below video is my updated 2022 Tutorial.
I also share hints and tips on my IG and Youtube channels.