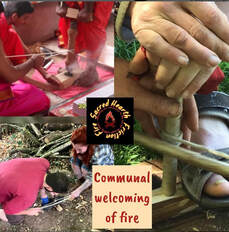
 SHFF is continuing to evolve - my focus is now on more further encouragement of communal welcoming of fire. I can welcome fire on my own using a variety of methods. I am most passionate about welcoming fire with others.
Traditionally the welcoming of fire has been a communal activity - you only need to look at photos of indigenous peoples - you always see at least 2 or 3 people helping each other. It’s only in this modern society where we have been conditioned to go it alone / challenge one self and we feel that we are failing if we need help. Myself included. Oh the Ego! When I teach people to rub sticks I encourage people to work together e.g make and use bow drill together - which can be challenging as naturally people want to do it on thier own (I do let people do that too😀) but we don’t have to or need to do things as a solo challenge This year I shall be endeavouring to do more communal fire welcoming and less solo rubbing of sticks - I’m not finding it as rewarding as when I engage and guide others and I am finding myself feeling less inclined to go out and practice on my own. (and I’m just going with it and not forcing anything - so atm I’m not rubbing sticks as much as I used to. I feel that I don’t need to. ) I especially would like to encourage and involve people who may not be able to welcome fire on thier own. Traditionally communities worked together. I also hope to communally and ritually welcome the ancestral fire using the fire churn more if the opportunity so arises. It’s a wonderful way to welcome the ancestral fire 🔥🙏 SHFF…rekindling our connection to the sacred - fire, ourselves, our ancestors, the land, our world - through rubbing sticks🔥 Rekindling the Neid Fire-Sacred Practice-Workshops-Ritual Blessings on the ancestral fire 🔥 Ian 🙏 #ancestralfire #sacredfire #ritualfire #alternativebristol #firebyfriction #frictionfire #mindbodyspirit #mindbodysoul #journeywithfire #animism #heathenism #paganism #shamanism #alternativefirelighting #ukfestivals #natureconnection #ceremony #ritual #fireritual #retreats #sacredcommunity #spiritualpractice #holisticliving #ancestralskills #fireapprentice #ritualtheatre #neidfire #folklore
There is always something to learn and something to pass on.
I have been soaking up knowledge and stories ; and exploring my connection with the ancestral fire through rubbing sticks for the last 10 years. I don’t teach friction fire in a bushcraft way (there are plenty of skilled bushcraft practitioners if you are wanting to learn efficient fire methods) but in my own holistic mystic (predictive txt! But i like it!) approach weaving in folklore, stories and the sacredness of fire. Connecting with ourselves, each other, nature, the world around and our ancestors. Encouraging communal traditional ritual fire welcoming and a deeper spiritual connection. If you feel called to my approach (few do thankfully as life is quite busy 😀) and would like to learn about welcoming and connecting with the ancestral fire through rubbing sticks in-person do get in touch, something may just happen at the right time. The universe does seem to connect me with the right people at the right time 🙏 And anyone can be involved in welcoming and connecting with the ancestral fire - that is also my passion to reach out to those who may have been put off from learning to rub sticks - you don’t need to be an avid outdoorsy type ; nor of certain ability ; nor demographic ; it’s not a solo challenge. we work together ; together with nature and the elements ; to welcome and explore and learn and connect. p.s I work in small groups / 1:1 Minds on Fire: Cognitive Aspects of Early Firemaking and the Possible Inventors of Firemaking Kits22/1/2024
I have recently discovered this interesting article within te Cambridge Acheological Journl :
Minds on Fire: Cognitive Aspects of Early Firemaking and the Possible Inventors of Firemaking Kits www.cambridge.org/core/journals/cambridge-archaeological-journal/article/minds-on-fire-cognitive-aspects-of-early-firemaking-and-the-possible-inventors-of-firemaking-kits/CF76FFCF540D58B6B1DACF17C4A51C94 I have demonstrated ice bearing blocks a few times but as it's sooo cold here atm I thought I'd do another demo ! A vid inspired by a comment on one of my youtube vids - basically a recap on my approach and I don't always take myself seriously :) I’m trying to just go with the flow … I’ve not felt inclined to rub sticks or post much for a while so I’m just going with it… not forcing anything. Today (14th Jan) it just felt right to select a piece of seasoned Popular and take time to carve a new set … being aware.. not rushing … just taking my time. Tweaking the blade until I was happy with the shape then tweaking base so it sits solidly on the ground. Taking time over my position and applying enough pressure. I burnt the set in … usually I pause but today it felt right to continue and after a while an ember was coaxed (very rarely do I coax an ember on first attempt with a fresh set.) today I was really connecting and not rushing. Honouring the ancestral fire and life itself 🙏
I then took my time with the tinder bundle, letting the ember develop , not rushing not blowing too hard ; slowly and tenderly feeding the ember with breath until it burst into flame 🔥🙏 there is a misconception that friction fire is difficult that you need to exert loads of energy and go fast and tire yourself out. Take your time.. take your time to learn, take your time to not get an ember, don’t see no ember as failure but as practice and learnings, take your time to experiment, take your time to practice, there are no prizes, no awards, just your ego, let it go and go deeper to connect. 🙏 SHFF…rekindling our connection to the sacred - fire, ourselves, our ancestors, the land, our world - through rubbing sticks🔥 Rekindling the Neid Fire-Sacred Practice-Workshops-Ritual Blessings on the ancestral fire 🔥 Ian 🙏 #ancestralfire #sacredfire #ritualfire #alternativebristol #firebyfriction #frictionfire #mindbodyspirit #mindbodysoul #journeywithfire #animism #heathenism #paganism #shamanism #alternativefirelighting #ukfestivals #natureconnection #ceremony #ritual #fireritual #retreats #sacredcommunity #spiritualpractice #holisticliving #ancestralskills #fireapprentice #ritualtheatre #neidfire #folklore Sacr please do checkout this very interesting interview by my friend Rune @nordic.animism with Professor of “Fire” Stephen J Pyne. I came across Pyne’s books a few years ago and have a few of his books and was fascinated about the way he talks about fire and the history of fire and the age of fire (the pyrocene) he approaches fire from a more scholarly/scientific angle rather than my more esoteric angle - so I find some of his writing a bit heavy going and tend to flick through to pick up key bits of info BUT backs up some of my own views and research and there is no one who has documented fire like Pyne - and I’ll adopt Pyne’s phrase of being a pyroromantic And thanks to Rune for mentioning me a few times 😍 As I like to say “we are forged from fire” - without Fire we wouldn't be here! I shall most likely do a post or even YouTube ramble on the pyrocene (a term dubbed by Stephen J Pyne) at some point from my angle on it - fire has become mechanised ; industrialised and internalised and hidden from view but we are still very much dependent on it. I like Pyne’s analogy that we are cooking (everything) on fire including the planet. I respect and honour fire through my own practice and approach - and for me my own sacred approach to fire is very important - we can not continue to cook the planet - and to change that our connection to fire must change on a deeper level is what I believe - tho I know I shall never get many - any!? (I know I do have a few😀) - followers in my approach 😀 🔥🙏 (I can’t see me ever becoming a fire cult - one may dream 🤣) Fire is in our DNA. We are forged from fire🔥🙏respect it; honour it; without it we wouldn’t be here - it is tied into the very fabric of life |
Archives
January 2024
Categories
All
|

 RSS Feed